So you’ve been wanting to ditch Iceweasel (Firefox) on you Kali Linux Distro right?So how about using Chrome / Chromium for a change? Worry not, you can easily switch or use both browsers in Kali Linux. All you have to do is add the official Debian repository to sources.list install and configure chromium. Sounds pretty easy right? Well sort of. Of course there will be some hiccups while installing Chromium (on Kali Linux) along the way that is why I decided to make this post in order to help fellow newb users (like us) survive installing that friggin popular browser in Kali Linux. UPDATE: Turns out you don’t have to edit the source.list to install Chromium. I have tried installing Chromium from a fresh install of Kali Linux. You could just skip editing the source list and go directly to installing Chromium using the terminal. However, I will leave the source list tutorial in the post for future reference.
Configure the Source list
The the source list or source.list is define by the Linux manual as theList of configured APT data sourcesPersonally for me, this source.list is a file that summarizes all internet address where your Linux distro will search for a particular application just like an app store. If you’re still confused of what is a source list is, you can imagine it as a mega App Store which can contain all the app entries from different app stores like Amazon, Google, Yandex, Nokia and others. Pretty amazing right? So what should we do with this source.list? We edit it and incorporate the “app store” from Debian. But first we need to know what to place on the source list. Lets head to my favorite Debian Source List Generator and generate our own source list. Here is an example of the options that I usually select in generating my source list.
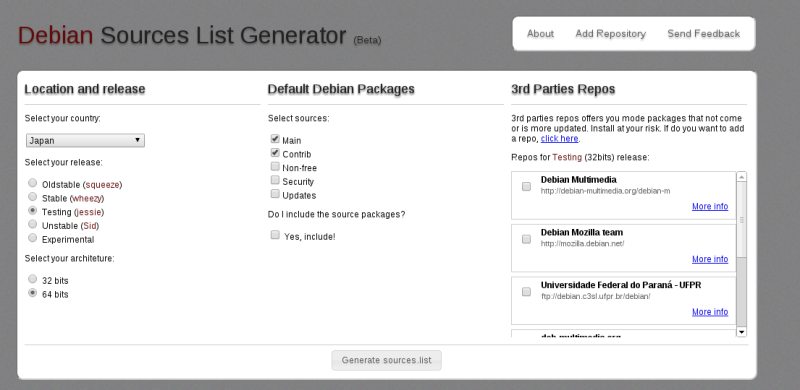
Yeah. Options. Options everywhere. But worry not, I am here to help you. In:
- Country: Select the nearest country where you live in. This option might determine your download speed from the said repository.
- Release: Select the type of software you wanted to install. I personally prefer selecting the “Testing” since the packages / apps here are nearly updated to match the package or app author’s release. You can call packages on this branch as somewhat bleeding-edge packages (not super stable packages but very much updated)
- Architecture: Select the type of OS that you are running. It’s either 32-bit or 64-bit
- Sources: I normally select Main and Contrib since I do not want Security / OS Updates coming from Debian (we have Kali Linux update branch on our repository by default!). Non-free is well, proprietary packages.
- Include source packages: Unless I wanted to build the app from scratch by compiling them, I won’t bother checking this option.
deb http://ftp.jp.debian.org/debian testing main contribNow that we have our sources.list entry, lets fire up terminal and start typing:
nano /etc/apt/source.listand press enter. The said command will open the sources/list file in your terminal and will be ready for editing. Oh by the way, here is an example of what a sources.list looks like:
## Security updatesYours might not look the same but don’t worry. It’s perfectly fine. Anyway, after opening the sources.list, navigate using keyboard to the bottom part and type:
deb http://security.kali.org/kali-security kali/updates main contrib non-free
## Debian Stuff ##
deb http://ftp.jp.debian.org/debian jessie main
## Contrib ##
deb http://ftp.jp.debian.org/debian jessie contrib
## Debian SourcesIn a the new line after ## Devian Sources paste the source list that you have generated earlier. Then after you have made the appropriate changes, press
CTRL + Xand press
YAfter returning to the terminal, try getting some beer and congratulate yourself! You have just learned how to edit the source.list of a Linux Distro! Anyway, lets move on. We have more work to do below.
Installing Chromium (via Terminal)

sudo apt-get update && sudo apt-get install chromiumAlso, you will have to confirm and press
Yto continue. Now, this will update the sources (App Store) and install chromium automatically. Pretty easy right? Don’t worry. I was kidding about the hard part. After installing Chromium, you can now run it in Applications > Internet. Go ahead. Run it.
Opening Chromium. Opening. Opening and…
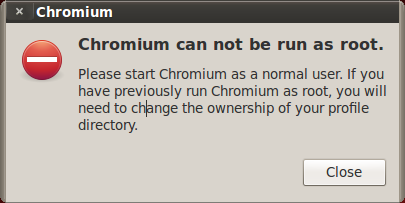
Heh. You were just trolled! Do not panic!Its normal. Normally Chromium could not be run as root. To get past this obstacle, we have to configure Chromium to run even if we are using the default user in Kali Linux (which is root). This will again involve the Terminal so get ready to type! First we have to go and edit the config file of Chromium (/etc/chromium/default). Now lets type:
nano /etc/chromium/defaultand press enter. By default you will see this in the default file:
# Default settings for chromium. This file is sourced by /bin/sh fromWhat we are going to do is edit this config file to allow us to run Chromium as root. According from brav0hax of Kali Linux Forum, in order to bypass the root notice which Chromium is giving us, we need to change the default flag to (or add it):
# /usr/bin/chromium
# Options to pass to chromium
CHROMIUM_FLAGS=”–password-store=detect”
–user-data-dirSo in short, the new default file will be:
# Default settings for chromium. This file is sourced by /bin/sh fromor
# /usr/bin/chromium
# Options to pass to chromium
CHROMIUM_FLAGS=”–user-data-dir”
# Default settings for chromium. This file is sourced by /bin/sh fromNow. After doing the appropriate changes, press
# /usr/bin/chromium
# Options to pass to chromium
CHROMIUM_FLAGS=”–password-store=detect –user-data-dir”
Ctrl + Xand press
Yto save changes. Congratulations! You can now run Chromium on you Kali Linux box without any hiccups! Enjoy!
Bonus Tip:
- You can add –incognito to always run Chromium in Incognito mode just like this: CHROMIUM_FLAGS=”–user-data-dir –incognito” or CHROMIUM_FLAGS=”–password-store=detect –user-data-dir –incognito”
- Also, you can just comment out the default values so that it will stay there with the file by adding # in front of it on a new line just like this #–password-store=detect
- For a list of arguments for Chromium, head to Peter Beverloo’s Site.


0 komentar:
Posting Komentar