Here we go............ There are two things that could go wrong here:
1. You don't have permissions to access the directory /var/lib/mysql/whatever.sock because mysql is the owner of the folder
or
2. /path/whatever.sock doesn't exist.
You can try this though [Linux specific, but what other operating systems are there?]
Go to /etc/my.cnf and change/add the lines:
[mysqld]
datadir=/var/lib/mysql
socket=/tmp/mysql.sock
[client]
socket=/tmp/mysql.sock
This way the client and server use the same socket and it's in a public
directory. This solves my MySql problems 98% of the time.
Jakub TCP
Linux localhost.localdomain 2.6.9-11.ELsmp
Sumber : http://forums.mysql.com/read.php?11,27769,59865
Minggu, 28 September 2014
Software Pendukung Di Kali Linux Yang Wajib Di Install

Assalamualikum wr.wb...
Selamat Membaca kawan...
postingan kali ini membahas Software-software pendukung di kali linux yang wajib di install :)mungkin kalian sudah tidak asing lagi sama software-software ini ,tapi apa salahnya saya berbagi :)simak ya kawan-kawan :D
Selamat Membaca kawan...
postingan kali ini membahas Software-software pendukung di kali linux yang wajib di install :)mungkin kalian sudah tidak asing lagi sama software-software ini ,tapi apa salahnya saya berbagi :)simak ya kawan-kawan :D
· Inkscape = software ini berguna mengedit gambar dalam bentuk vektor, mungkin bagi pengguna linux dapat berguna pada kasus tertentu, misal: mengumpulkan data berupa gambar yang sedikit harus di ubah..
· LibreOffice = nah software ini berguna untuk membuka file-file dokumen yang ada di windows, misal: ms.word, ms.excel, ms.pwrpoint, dll..
· Rythmbox Music Player = walaupun udah ada VLC di kali linux, tapi tambahan software ini bisa nemenin diri yang galau saat aksi hacking..
· Blue J = ini di khusus kan untuk Java Proggraming, buat para proggramer biar ga usah bingung kalo mau coding, dan buat para newbie bisa belajar dikit-dikit lah..
· Lazarus = sama kegunaanya dg BLUE J tapi ini bahasa pascal..
· Google Chrome = yang ini pesaing Iceweasel kalo pengen buka 2 akun FB sekaligus di kali linux.. hehe, mksdnya login di iceweasel juga di Google Chrome juga..
· Cheese = ini software penting banget buat orang eksis kaya saya, hehe. buat cekrek-cekrek webcam lumayan lah.
· Tuxcut = kalo di windows kan Netcut nah di linux namanya Tuxcut, sama halnya netcut, tuxcut ini buat motong koneksi orang lain dalam jaringan yang sama, biar browsingnya ngebut gitu.. hehe
· Team Viewer = buat yang butuh bimbingan saat belajar kali linux ini wajib, cos dari pada guru kita yang jauh di sana di repotin mending pake Team Viewer aja, tinggal ganti deh biaya internet gurunya.. hehe
· Gnome-Tweak = buat yang butuh tampilan lebih wah. software ini wajib banget tertanam di kali linux anda sekalian, hehe, biar bisa gonta ganti tema gitu.
· RecordMyDesktop = nah ini buat yang mau sharing pengalamannya, gunanya buat rekam aktivitas di laptop/pc kesayangan anda..
Sekian 11 software yang saya rasa wajib di tanam. mungkin masih banyak lagi tapi kalo sekedar pendukung kali linux ya cukup lah,, untuk penginstalan Software tersebut akan menyusul postingan berikutnya.. hehehe
Sumber : Kali Linux Indonesia
Sabtu, 27 September 2014
Cara Install Phpmyadmin di Localhost Kali Linux
hallo kawan kali ini saya akan berbagi tentang Cara Install Phpmyadmin di Localhost Kali Linux.
Bila tidak ada tulisan di atas maka tidak akan terjadi apa-apa :D
setelah itu kita harus memulai service apache dan mysql nyaa :D
ini dia commandnyaa :
okeee !!
service mysql dan apache sudah run :D
sekarang kita ganti user default password di localhost dengan yang ingin kita tentukan di mysqlnya :D
ini dia commandnya :D
nah sudah masuk bukan ??
dan disitu juga keluar untuk input command ke konfigurasi mysql :D
Lanjut tentang Cara Install Phpmyadmin di Localhost Kali Linux nya ? :D
oke masukkan lagi command untuk konfigurasi di mysqlnya :D
setelah itu ketik exit dan enter :D
setelah itu kita update :D
dengan command di bawah ini :
udah ???
belum kelesss :v :v
kita install duluu phpmyadmin-nya :D
nah bila di install kita disuruh untuk memasukkan password disitu :)
masukkin password yang kamu set di konfigurasi mysql kamu :D
setelah masukin password tekan spasi di apache2 jangan yang lighthttpd :D
setelah itu tekan ok :D
nah abis selesai install nyaa kita cek terlebih dahulu sudah ada /belum database untuk phpmyadminya :D
dengan command berikut ini :D
nah kan kita masuk kembali seperti tadi..
kita masukkan lagi perintah seperti dibawah ini :D
setelah itu ketik exit lalu enter :D
sudah keluar bukan tabel phpmyadmin nyaa ?? :D
sudah sampe sini ???
belummm euyyy mau kemana sii buru-buru aja :D
lanjut yaaa :D
kita include dluu konfigurasi phpmyadmin apache-nya ke apache2 :)
dengan perintah seperti dibawah ini :D
setelah itu kita restart service apache2 nya :D
dengan perintah berikut ini :D
nah sampai dengan ini kita sepertinya sukses :D
bisa kita liat phpmyadmin nya dii
lalu anda masukkan password yang sudah dikonfigurasi tadi :D
mudah bukan tutorial yang saya buat tentang Cara Install Phpmyadmin di Localhost Kali Linux ini :D
akhir kata assalamu alaikum wr.wb :)
Sumber : http://bekasicoders.blogspot.com/2014/04/cara-install-phpmyadmin-di-localhost-kali-linux.html
Code:
root@vergos33:~# apache2 -v && mysql -V && php -vServer version: Apache/2.2.22 (Debian)Server built: Jan 31 2014 18:55:37mysql Ver 14.14 Distrib 5.5.35, for debian-linux-gnu (i686) using readline 6.2PHP 5.4.4-14+deb7u8 (cli) (built: Feb 18 2014 13:52:21) Copyright (c) 1997-2012 The PHP GroupZend Engine v2.4.0, Croot@vergos303:copyright (c) 1998-2012 Zend Technologiesroot@vergos303:~#Bila tidak ada tulisan di atas maka tidak akan terjadi apa-apa :D
setelah itu kita harus memulai service apache dan mysql nyaa :D
ini dia commandnyaa :
Code:
root@vergos303:~# service apache2 start && mysql service start[....]
Starting web server: apache2[Wed Apr 16 15:21:06 2014] [warn] The Alias
directive in /etc/phpmyadmin/apache.conf at line 3 will probably never
match because it overlaps an earlier Alias.apache2: Could not reliably determine the server's fully qualified domain name, using 127.0.1.1 for ServerNamehttpd (pid 27197) already running. ok [ ok ] Starting MySQL database server: mysqld already running.root@vergos303:~# okeee !!
service mysql dan apache sudah run :D
sekarang kita ganti user default password di localhost dengan yang ingin kita tentukan di mysqlnya :D
ini dia commandnya :D
Code:
root@vergos303:~# mysql -h localhost -u root -pnah sudah masuk bukan ??
dan disitu juga keluar untuk input command ke konfigurasi mysql :D
Lanjut tentang Cara Install Phpmyadmin di Localhost Kali Linux nya ? :D
oke masukkan lagi command untuk konfigurasi di mysqlnya :D
Code:
mysql> set password for root@localhost = password('tulispasswordkamu');setelah itu ketik exit dan enter :D
setelah itu kita update :D
dengan command di bawah ini :
Code:
root@vergos303:~# apt-get updateudah ???
belum kelesss :v :v
kita install duluu phpmyadmin-nya :D
Code:
root@vergos303:~# apt-get install phpmyadminnah bila di install kita disuruh untuk memasukkan password disitu :)
masukkin password yang kamu set di konfigurasi mysql kamu :D
setelah masukin password tekan spasi di apache2 jangan yang lighthttpd :D
setelah itu tekan ok :D
nah abis selesai install nyaa kita cek terlebih dahulu sudah ada /belum database untuk phpmyadminya :D
dengan command berikut ini :D
Code:
root@vergos303:~# mysql -h localhost -u root -pkita masukkan lagi perintah seperti dibawah ini :D
Code:
mysql> show databases; (lalu enter)sudah keluar bukan tabel phpmyadmin nyaa ?? :D
sudah sampe sini ???
belummm euyyy mau kemana sii buru-buru aja :D
lanjut yaaa :D
kita include dluu konfigurasi phpmyadmin apache-nya ke apache2 :)
dengan perintah seperti dibawah ini :D
Code:
root@vergos303:~# find /etc -name apache.conf (lalu enter)/etc/phpmyadmin/apache.confroot@vergos303:~# fing /etc -name apache2.conf (lalu enter)/etc/apache2/apache2.confroot@vergos303:~# echo -e "\nInclude /etc/phpmyadmin/apache.conf" >> /etc/apache2/apache2.conf (lalu enter)setelah itu kita restart service apache2 nya :D
dengan perintah berikut ini :D
Code:
root@vergos303:~# service apache2 restart (lalu enter)nah sampai dengan ini kita sepertinya sukses :D
bisa kita liat phpmyadmin nya dii
Code:
http://localhost/phpmyadminlalu anda masukkan password yang sudah dikonfigurasi tadi :D
mudah bukan tutorial yang saya buat tentang Cara Install Phpmyadmin di Localhost Kali Linux ini :D
akhir kata assalamu alaikum wr.wb :)
Sumber : http://bekasicoders.blogspot.com/2014/04/cara-install-phpmyadmin-di-localhost-kali-linux.html
20 things to do after installing Kali Linux
20 things to do after installing Kali Linux
I’ve compiled a small list of things that I always perform after installing a fresh copy of Kali Linux in this post. Because I got multiple laptops and workstations, I’ve tried to generalize the following instructions to suit everyone’s(including mine??) requirements. This is my top list of 20 things to do after installing Kali Linux. Your requirement’s might be completely different. If you have a suggestion, let me know via comments section. You can comment without registering.. so that’s an easy way to give me feedback and opinion.
Standard Packages:
Standard packages contains anything and everything I found useful. This list if divided into 3 parts:- Kali Specific
Kali Linux is a special build from
Debian. Kali Linux inherits a lot of the issues from Debian Linux. This
section shows you how to resolve of those. They are not specific to Kali
Linux only and you might be leave them as it is, but I found that if I
see an error my OCD kicks in and I have to make it go away…
- Useful utilities and Software’s
A collection of utilities and software’s I
found useful. These are day to day software’s that are available in
most other Linux distributions or at least I think they should be made
available as part of a default installation.
- Enhancements and accessibility
Kali Linux is made to boot up fast and
low of resources. But if you have some more CPU and GPU power to spare,
you might want to try to make it look more colorful.
Contents [hide]
- 20 things to do after installing Kali Linux
- Standard Packages:
- Kali Specific:
- Useful utilities and Software’s
- 6. Install Java
- 7. Install Flash
- 8. Install File Roller – Archive Manager
- 9. Add a standard user
- 10. Add add-apt-repository
- 11. Install Tor
- 12. Install Filezilla FTP Client
- 13. Install HTOP and NetHogs
- 14. Install proprietary drivers for your Graphics card
- 15. Install Recordmydesktop and Reminna Remote Desktop Client
- 16. Install GDebi Package Manager
- Enhancements and accessibility
- More Advanced stuffs:
- What can I do with Kali Linux?
- Conclusion
- Google+
- Related
Kali Specific:
1. Fix Device not managed error – wired network
If you want NetworkManager to handle interfaces that are enabled in/etc/network/interfaces: Set managed=true in /etc/NetworkManager/NetworkManager.conf. So this file looks like:[main] plugins=ifupdown,keyfile [ifupdown] managed=true
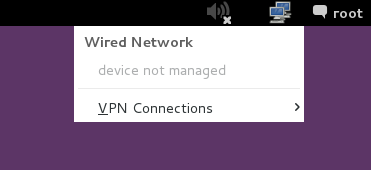
Read the full article on fixing Wired Network interface “Device not managed” error in Debian or Kali Linux.
2. Fix default repository
The simplest way is to edit the /etc/apt/sources.list remove or comment every-line with # at the front and add the following lines..leafpad /etc/apt/sources.listComment or remove existing config with the following lines:
## Regular repositories
deb http://http.kali.org/kali kali main non-free contrib
deb http://security.kali.org/kali-security kali/updates main contrib non-free
## Source repositories
deb-src http://http.kali.org/kali kali main non-free contrib
deb-src http://security.kali.org/kali-security kali/updates main contrib non-free
Save and close the file. Details and explanations can be found in adding official Kali Linux Repositories page.
3. Update, Upgrade, Dist-Upgrade
Clean, update, upgrade and dist-upgrade your Kali installation.apt-get clean && apt-get update && apt-get upgrade -y && apt-get dist-upgrade -y
4. Fix PulseAudio warning
My Kali throws me this warning:[warn] PulseAudio configured for per-user sessions ... (warning).leafpad /etc/default/pulseaudioPULSEAUDIO_SYSTEM_START=0PULSEAUDIO_SYSTEM_START=1reboot5. Enable sound on Boot
Follow the steps below to fix sound mute in Kali Linux on bootapt-get install alsa-utils -yIn GNOME Desktop (The default Kali Desktop)
- Right Click on the small volume ICON and select Sound Preferences
- Alternatively, you can also go to Applications > System Tools > Preferences > System Settings > Sound to bring up the same options.
- Use the Output volume slider to ON, shown similar the screenshot above. That’s it you’re done. Close Sound window.
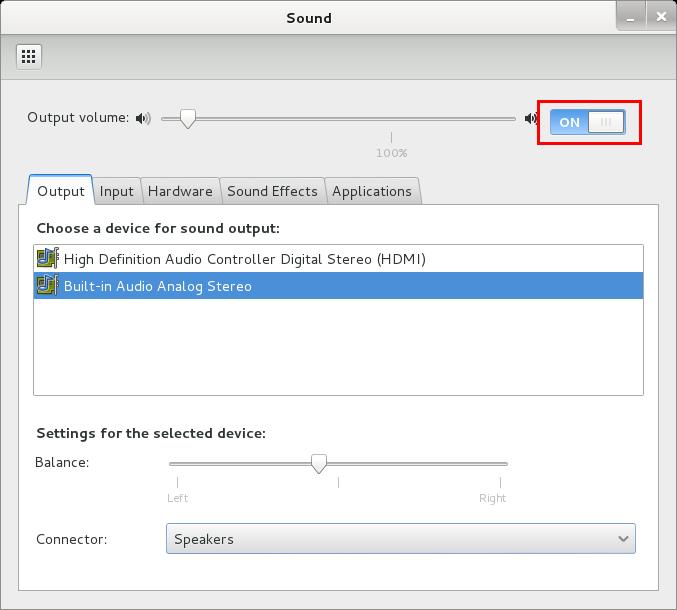
Details and explanations can be found in fixing sound mute in Kali Linux on boot page.
Useful utilities and Software’s
6. Install Java
Go to the following link and download jdk7. At the time of writing this guide the jdk version was jdk-7u45-linux-x64. Note that I’m using x64 which is 64-bit. 32-bit users should choose their versions accordingly. Not that tough really!Following is what I’ve used. JDK-7u45-Linux-x64 At the time of writing this guide the available version was jdk-7u45-linux-x64.tar.gz Download and save the file in /root directory.
tar -xzvf /root/jdk-7u45-linux-x64.tar.gz
mv jdk1.7.0_45 /opt
cd /opt/jdk1.7.0_45
This step registers the downloaded version of Java as an alternative, and switches it to be used as the default:
update-alternatives --install /usr/bin/java java /opt/jdk1.7.0_45/bin/java 1
update-alternatives --install /usr/bin/javac javac /opt/jdk1.7.0_45/bin/javac 1
update-alternatives --install /usr/lib/mozilla/plugins/libjavaplugin.so mozilla-javaplugin.so /opt/jdk1.7.0_45/jre/lib/amd64/libnpjp2.so 1
update-alternatives --set java /opt/jdk1.7.0_45/bin/java
update-alternatives --set javac /opt/jdk1.7.0_45/bin/javac
update-alternatives --set mozilla-javaplugin.so /opt/jdk1.7.0_45/jre/lib/amd64/libnpjp2.so
Follow installing Java JDK in Kali Linux post for step by step instructions and testing options.
7. Install Flash
This is fairly simple and easy and should work from most people out there: In the terminal:apt-get install flashplugin-nonfreeand then type in:
update-flashplugin-nonfree --installThat’s it. You flash should be working as expected.

Follow installing Flash in Kali Linux post for step by step instructions and testing options. This post also includes manual Flash installation procedures for those whose installation might fail with above mentioned process.
8. Install File Roller – Archive Manager
Kali Linux lacks a proper GUI archive manager. Install it Archive Manager (File Roller) using the following command:apt-get install unrar unace rar unrar p7zip zip unzip p7zip-full p7zip-rar file-roller -yYou can now find Archive Manager in Applications > Accessories > Archive Manager.
9. Add a standard user
Kali Linux got only root user by default. While most applications require root access, it’s always a good idea to add a second user. Open terminal and type following to create new user (replace user1 with your desired user name)useradd -m user1(Note: -m means create home directory which is usually /home/username)

Now set password for this user
passwd user1Enter desired password twice Add user to sudo group (to allow user to install software, allow printing, use privileged mode etc.)
usermod -a -G sudo user1(Note: -a means append or add and –G mean to specified group/groups) Change default shell of previously created user to bash
chsh -s /bin/bash user1To learn more, follow this excellent and detailed post on adding remove user (standard user/non-root) in Kali Linux. This post explains how to add a user with all user directories already in place (thereby avoiding “Could not update .ICEauthority var/lib/gdm3/.ICEauthority” or any error containing .ICEauthority or permission in general.
10. Add add-apt-repository
Debian allows users to add and use PPA repositories by an application named add-apt-repository however, Kali Linux didn’t include this in their default package list. With Kali, because this is a special purpose application and certain modifications were made to make it work for what it does best (Penetration Test). To enable PPA Repository via add-apt-repository application, follow the steps below: First install Python Software properties package.apt-get install python-software-propertiesNext install
apt-fileapt-get install apt-fileUpdate
apt-file.apt-file updateThis takes a while, so in case your apt-file update is SLOW, you might want to try and fix that as well. (Note that I got
repo.kali.org in my /etc/apt/sources.list file instead of http.kali.org.) Once apt-file update is complete, you should be able to search for it.apt-file search add-apt-repositoryYour output should look similar to this:
python-software-properties: /usr/bin/add-apt-repository
python-software-properties: /usr/share/man/man1/add-apt-repository.1.gz
The default
add-apt-repository application located in (/usr/bin/add-apt-repository)
works for Debian. So if you’re using Kali, chances are it won’t work.
There’s a nice fix for that which I will add at the bottom of this post,
(try them on VirtualBox if you feel like). But I found we can just
mimic Ubuntu Oneiric to make add-apt-repository work.cd /usr/sbin vi add-apt-repositoryAdd the following code and save the file.
#!/bin/bash
if [ $# -eq 1 ]
NM=`uname -a && date`
NAME=`echo $NM | md5sum | cut -f1 -d" "`
then
  ppa_name=`echo "$1" | cut -d":" -f2 -s`
  if [ -z "$ppa_name" ]
  then
    echo "PPA name not found"
    echo "Utility to add PPA repositories in your debian machine"
    echo "$0 ppa:user/ppa-name"
  else
    echo "$ppa_name"
    echo "deb http://ppa.launchpad.net/$ppa_name/ubuntu oneiric main " >> /etc/apt/sources.list
    apt-get update >> /dev/null 2> /tmp/${NAME}_apt_add_key.txt
    key=`cat /tmp/${NAME}_apt_add_key.txt | cut -d":" -f6 | cut -d" " -f3`
    apt-key adv --keyserver keyserver.ubuntu.com --recv-keys $key
    rm -rf /tmp/${NAME}_apt_add_key.txt
  fi
else
  echo "Utility to add PPA repositories in your debian machine"
  echo "$0 ppa:user/ppa-name"
fi
Note: In this line echo "deb http://ppa.launchpad.net/$ppa_name/ubuntu oneiric main" >> /etc/apt/sources.list I’ve used Oneiric. You can try to use Lucid, Raring or Saucy as per your choice. Now chmod and chown the file.chmod o+x /usr/sbin/add-apt-repository chown root:root /usr/sbin/add-apt-repositoryNow that we added the correct code, we can use
add-apt-repository to add a PPA repository. I tried the following to add themes and custom icons in Kali Linux./usr/sbin/add-apt-repository ppa:noobslab/themes /usr/sbin/add-apt-repository ppa:alecive/antigone
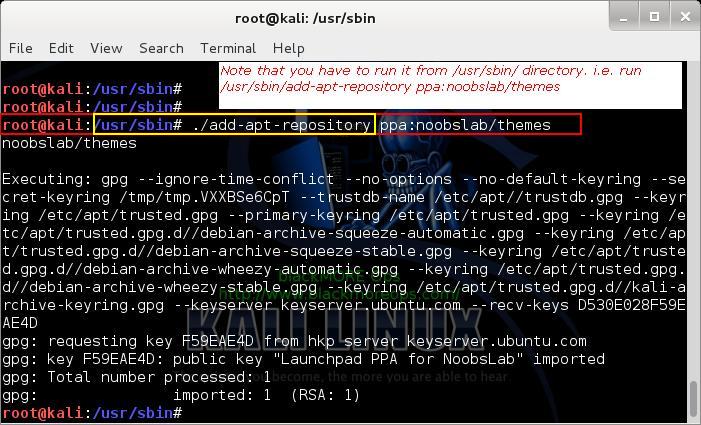
I’ve removed all screenshots from this post, but if you want see read and understand how it all works, I suggest reading the details post on adding PPA repository add-apt-repository in Kali Linux.
11. Install Tor
Tor is free software and an open network that helps you defend against traffic analysis, a form of network surveillance that threatens personal freedom and privacy, confidential business activities and relationships, and state security. This guide guides your through installing tor in Kali Linux. Tor protects you by bouncing your communications around a distributed network of relays run by volunteers all around the world: it prevents somebody watching your Internet connection from learning what sites you visit, and it prevents the sites you visit from learning your physical location.Tor is available in Kali repository, to install it directly from the repository open your Terminal and type this:
apt-get install torEnable tor service from command line:
service tor startBrowse with confident by using proxychains and tor
proxychains iceweaselTo keep things simple in this post, I’ve only shows one part of using Tor. You might want to read the full details in Installing Tor In Kali Linux post.
12. Install Filezilla FTP Client
No Linux installation is complete with a proper fully fledged FTP Client. Filezilla is the best out there, so install Filezilla using the following command:apt-get install filezilla filezilla-common -y
13. Install HTOP and NetHogs
This is a special one, HTOP shows running process and memory used including many more details. (you could use top command, but HTOP is just more useful). NetHogs is useful and it shows traffic used by applications per interface. Install them using the following command:apt-get install htop nethogs -yYou can now run then using the following commands:
htop
nethogs eth0
nethogs wlan0
I’m almost certain, you’ll enjoy using these tiny tools.
14. Install proprietary drivers for your Graphics card
Depending on which graphics card you’re using, (AMD or NVIDIA), you might want to install proprietary drivers to unlock more features. There’s some excellent post I’ve made on Install AMD ATI proprietary driver (fglrx) in Kali Linux.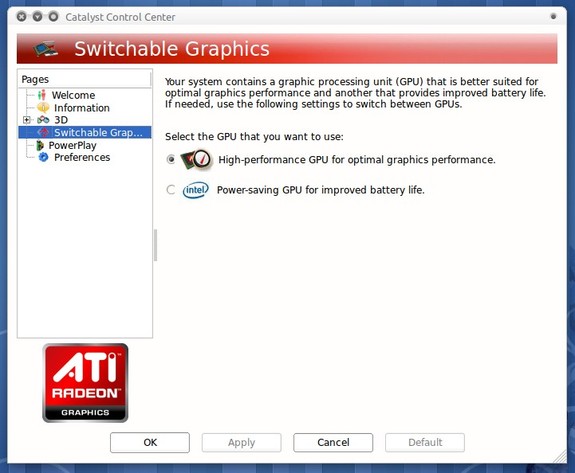
NVIDIA users can just stick to the official documentation for installing NVIDIA Drivers. In case, official documentation is not working or you’ve hit rock bottom, you can try following this other post I’ve written to install NVIDIA binary drivers manually.

15. Install Recordmydesktop and Reminna Remote Desktop Client
Recordmydesktop gives you the ability to record and make a video of your activities in Kali Linux. Remmina is simialar to Windows Remote Desktop Client. Both very useful. Install them using the following command:apt-get install gtk-recordmydesktop recordmydesktop remmina -y
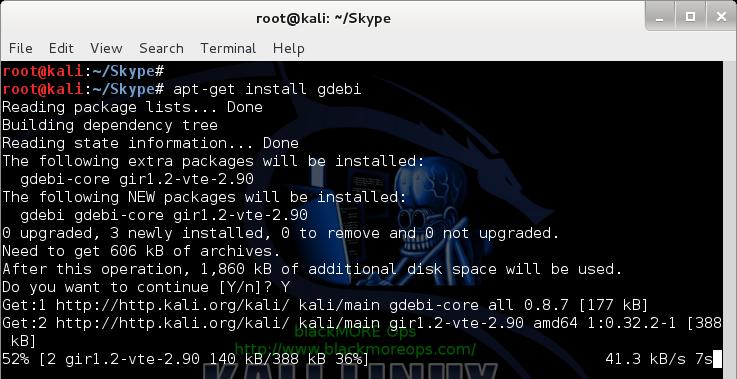
16. Install GDebi Package Manager
dpkg is a powerful tool, but it doesn’t install
dependencies automatically. What we need is some package installer that
can go out and fetch all required dependencies while installing a .deb package. The best one out there is gdebi. Install it using the following command:apt-get install gdebi -y
Enhancements and accessibility
17. Install a theme
Installing theme and revving up your desktop is a great idea. Kali default desktop is dull and boring. There’s two different ways you can change theme.- Manually install theme
- Install theme via PPA repository
18. Install a new desktop environment (I prefer XFCE).
I prefer XFCE Desktop, but you can try to install/remove different Desktop Environments or Window Manager in Kali Linux Depending on which one you need choose links below:- How to install/remove XFCE Desktop Environment in Kali Linux
- How to install/remove different KDE Desktop Environments in Kali Linux
- How to install/remove LXDE Desktop Environment in Kali Linux
- How to install/remove GNOME Desktop Environment on Kali Linux
- How to install/remove Cinnamon Desktop Environment in Kali Linux
- How to install/remove MATE Desktop Environment in Kali Linux
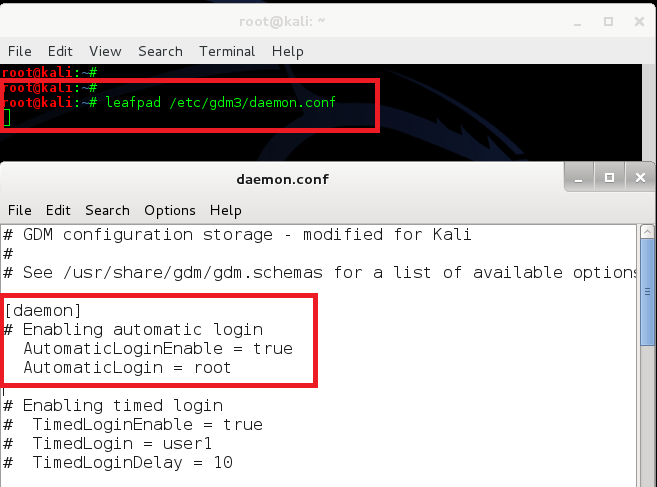
19. Enable Autologin user
It’s a simple change. Just open and edit the file called/etc/gdm3/daemon.conf,
assuming you’re using GNOME Display Manager(gmd3) a your main Display
Manager. You might want to try out other desktops as well. Here’s a link
to Add/Remove different desktop Managers in Kali Linux.root@kali:~# leafpad /etc/gdm3/daemon.conf
In the daemon section un-comment the 2 lines for automatic login. It should finally look like this
[daemon]
# Enabling automatic login
  AutomaticLoginEnable = true
  AutomaticLogin = root
That’s it. Too easy. In case you’re wondering how to use a different user than
root, here’s how[daemon] # Enabling automatic login AutomaticLoginEnable = true AutomaticLogin = myanotheruser
Last but not the least, reboot to check if it worked. (which it will, cause it’s Linux and Kali is awesome)
reboot
You might want to follow up on this one or if you’re KDE user, then here’s the instructions to Auto login root user at system start in Kali Linux – GNOME and KDE. This article also shows how to auto-login a different non-root user… quite handy.
More Advanced stuffs:
This part explains how to get more out of your system, specially Graphics card.20. Unlock GPU processing
Last but not the least, GPU processing is a lot faster when you’re trying to break a password. Depending on your Graphics card, you choose options as outlined below:a. AMD
Then follow rest of the guides here
b. NVIDIA
I found that official documentation for installing NVIDIA Drivers doesn’t
work for Kali Linux due to a UVM error. Following two posts will take
you through installing NVIDIA official driver and CUDA+Pyrit (updated 26/08/2014)
What can I do with Kali Linux?
You can do a lot. Here’s some starting guides for those who are interested: (updated 03/09/2014)Cracking Wifi WPA/WPA2 passwords
- Cracking Wifi WPA/WPA2 passwords using pyrit cowpatty
- Cracking Wireless WPA2 WPA passwords with Hashcat
- Cracking Wifi WPA/WPA2 passwords using Reaver-WPS
Cracking password hashes
DOS/DDOS attacks
SQLMap and Google Dorks
These are some of the guides I have in darkMOREOps.com. They will surely keep you busy for few days. I suggest looking around in Kali forums and generally Google for more interesting stuffs.Conclusion
Hope you’ve found these useful. You might not have to use all of these, but some are definitely recommended. Thanks for reading. Please share.Sumber : http://www.blackmoreops.com/2014/03/03/20-things-installing-kali-linux/
Installing Chrome / Chromium on Kali Linux (plus tutorial on editing sources.list)

So you’ve been wanting to ditch Iceweasel (Firefox) on you Kali Linux Distro right?So how about using Chrome / Chromium for a change? Worry not, you can easily switch or use both browsers in Kali Linux. All you have to do is add the official Debian repository to sources.list install and configure chromium. Sounds pretty easy right? Well sort of. Of course there will be some hiccups while installing Chromium (on Kali Linux) along the way that is why I decided to make this post in order to help fellow newb users (like us) survive installing that friggin popular browser in Kali Linux. UPDATE: Turns out you don’t have to edit the source.list to install Chromium. I have tried installing Chromium from a fresh install of Kali Linux. You could just skip editing the source list and go directly to installing Chromium using the terminal. However, I will leave the source list tutorial in the post for future reference.
Configure the Source list
The the source list or source.list is define by the Linux manual as theList of configured APT data sourcesPersonally for me, this source.list is a file that summarizes all internet address where your Linux distro will search for a particular application just like an app store. If you’re still confused of what is a source list is, you can imagine it as a mega App Store which can contain all the app entries from different app stores like Amazon, Google, Yandex, Nokia and others. Pretty amazing right? So what should we do with this source.list? We edit it and incorporate the “app store” from Debian. But first we need to know what to place on the source list. Lets head to my favorite Debian Source List Generator and generate our own source list. Here is an example of the options that I usually select in generating my source list.

Yeah. Options. Options everywhere. But worry not, I am here to help you. In:
- Country: Select the nearest country where you live in. This option might determine your download speed from the said repository.
- Release: Select the type of software you wanted to install. I personally prefer selecting the “Testing” since the packages / apps here are nearly updated to match the package or app author’s release. You can call packages on this branch as somewhat bleeding-edge packages (not super stable packages but very much updated)
- Architecture: Select the type of OS that you are running. It’s either 32-bit or 64-bit
- Sources: I normally select Main and Contrib since I do not want Security / OS Updates coming from Debian (we have Kali Linux update branch on our repository by default!). Non-free is well, proprietary packages.
- Include source packages: Unless I wanted to build the app from scratch by compiling them, I won’t bother checking this option.
deb http://ftp.jp.debian.org/debian testing main contribNow that we have our sources.list entry, lets fire up terminal and start typing:
nano /etc/apt/source.listand press enter. The said command will open the sources/list file in your terminal and will be ready for editing. Oh by the way, here is an example of what a sources.list looks like:
## Security updatesYours might not look the same but don’t worry. It’s perfectly fine. Anyway, after opening the sources.list, navigate using keyboard to the bottom part and type:
deb http://security.kali.org/kali-security kali/updates main contrib non-free
## Debian Stuff ##
deb http://ftp.jp.debian.org/debian jessie main
## Contrib ##
deb http://ftp.jp.debian.org/debian jessie contrib
## Debian SourcesIn a the new line after ## Devian Sources paste the source list that you have generated earlier. Then after you have made the appropriate changes, press
CTRL + Xand press
YAfter returning to the terminal, try getting some beer and congratulate yourself! You have just learned how to edit the source.list of a Linux Distro! Anyway, lets move on. We have more work to do below.
Installing Chromium (via Terminal)

sudo apt-get update && sudo apt-get install chromiumAlso, you will have to confirm and press
Yto continue. Now, this will update the sources (App Store) and install chromium automatically. Pretty easy right? Don’t worry. I was kidding about the hard part. After installing Chromium, you can now run it in Applications > Internet. Go ahead. Run it.
Opening Chromium. Opening. Opening and…

Heh. You were just trolled! Do not panic!Its normal. Normally Chromium could not be run as root. To get past this obstacle, we have to configure Chromium to run even if we are using the default user in Kali Linux (which is root). This will again involve the Terminal so get ready to type! First we have to go and edit the config file of Chromium (/etc/chromium/default). Now lets type:
nano /etc/chromium/defaultand press enter. By default you will see this in the default file:
# Default settings for chromium. This file is sourced by /bin/sh fromWhat we are going to do is edit this config file to allow us to run Chromium as root. According from brav0hax of Kali Linux Forum, in order to bypass the root notice which Chromium is giving us, we need to change the default flag to (or add it):
# /usr/bin/chromium
# Options to pass to chromium
CHROMIUM_FLAGS=”–password-store=detect”
–user-data-dirSo in short, the new default file will be:
# Default settings for chromium. This file is sourced by /bin/sh fromor
# /usr/bin/chromium
# Options to pass to chromium
CHROMIUM_FLAGS=”–user-data-dir”
# Default settings for chromium. This file is sourced by /bin/sh fromNow. After doing the appropriate changes, press
# /usr/bin/chromium
# Options to pass to chromium
CHROMIUM_FLAGS=”–password-store=detect –user-data-dir”
Ctrl + Xand press
Yto save changes. Congratulations! You can now run Chromium on you Kali Linux box without any hiccups! Enjoy!
Bonus Tip:
- You can add –incognito to always run Chromium in Incognito mode just like this: CHROMIUM_FLAGS=”–user-data-dir –incognito” or CHROMIUM_FLAGS=”–password-store=detect –user-data-dir –incognito”
- Also, you can just comment out the default values so that it will stay there with the file by adding # in front of it on a new line just like this #–password-store=detect
- For a list of arguments for Chromium, head to Peter Beverloo’s Site.
Kamis, 18 September 2014
Membuat CCTV Sederhana Menggunakan VLC dan Android di OS Linux / Windows
Webcam,siapa yang tidak mengenal perangkat yang satu ini. Mungkin dari sobat sekalian sudah banyak yang memanfaatkan perangkat ini,baik itu untuk kebutuhan bernasis ria maupun untuk kegiatan lain,seperti video konfersi jarak jauh maupun sebagai kamera pengintai (CCTV).
Kali ini,penulis akan mencoba tutorial membuat kamera pengintai (CCTV) sederhana,meskipun dalam prakteknya sangat jauh dari CCTV yang sesunguhnya hehehe. Tapi tak apalah,yang penting bisa digunakan untuk memantau dari layar laptop/komputer kita.
Baiklah,alat-alat yang perlu di persiapkan adalah:
- Ponsel Android
Kenapa penulis memakai Ponsel Android,ide awalnya sebenarnya penulis ingin membuat CCTV menggunakan webcam yang sesungguhnya dan terintegrasi dengan ubuntu yang dimiliki penulis,tapi dikarenakan penulis belum mempunyai webcamnya,sementara coba pakai Ponsel Android yang dimiliki oleh penulis (bukankah kita harus memanfaatkan teknologi yang ada hehehe). - Aplikasi IP Webcam
Aplikasi untuk menjadikan kamera di Ponsel Android sobat sekalian menjadi webcam pribadi,cara kerja aplikasi ini yaitu dengan menggunakan satu jaringan wifi antara Ponsel Android dengan laptop/PC. Aplikasi ini dapat di unduh secara gratis di Playstore Android sobat sekalian. - Laptop/PC
Siapkan laptop atau PC yang sudah terpasang wifi USB,pastikan wifi di laptop dapat berfungsi dengan lancar,baik sebagai pemancar maupun sebagai penerima. - Software VLC player
Mungkin kebanyakan sobat memanfaatkan VLC player sebagai pemutar video (termasuk penulis),baik untuk menonton film atau mendengarkan musik. Tapi tahukah sobat sekalian,VLC player ternyata dapat digunakan juga sebagai tools untuk menampilkan/monitoring CCTV kita. - Jaringan Internet
Dapat berupa wifi maupun tethering dan hotspot dari ponsel kita.
Langsung saja,langkah-langkahnya adalah sebagai berikut:
- Download IP Webcam dari playstore,di Ponsel Android sobat sekalian.

- Jika belum mempunyai VLC player,kita bisa langsung mendownloadnya,VLC player ini sudah tersedia di repository bawaan ubuntu. Sobat dapat menginstall software ini via ubuntu software center maupun langsung via terminal perintahnya adalah “sudo apt-get install VLC” (syaratnya tentu saja laptop/PC kita sudah terhubung dengan internet).


- Baik,sekarang kita samakan jaringan internet antara ponsel kita dengan laptop/PC kita. Dapat menggunakan wifi,maupun menggunakan tethering ponsel android kita.
- Di sini penulis coba menggunakan tethering/hotspot via Ponsel Android yang penulis miliki. Langkah-langkahnya ialah masuk ke setting > data usage (more) > tethering & mobile hotspot.

- Setelah itu kita connect kan wifi di laptop/PC kita dengan nama tethering/hotspot yang telah kita buat tadi.
- Setelah sudah terhubung,sekarang coba langsung kita buka aplikasi IP Webcam kita di situ kita dapat mengatur berbagai hal untuk webcam kita,mulai dari resolusi video,effect webcam,power management dan lain-lain.

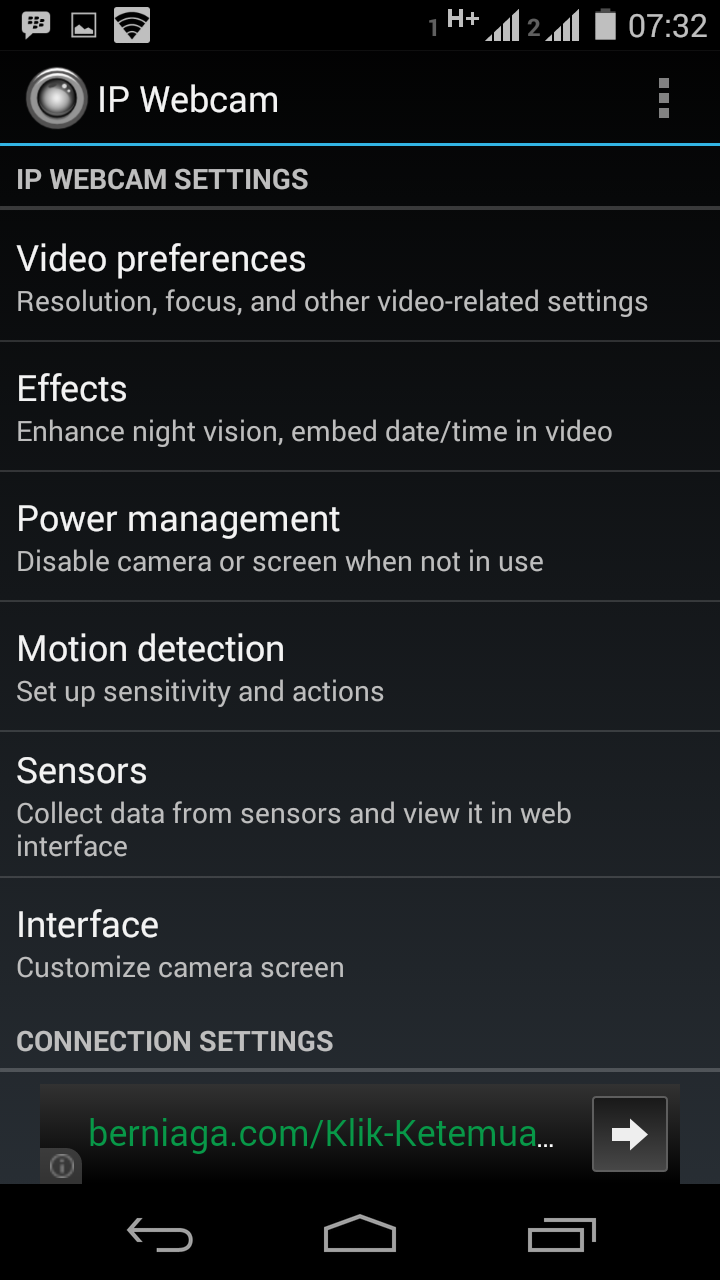
- Setelah semua mulai di atur,kita pilih pilihan paling bawah sendiri yakni start server.
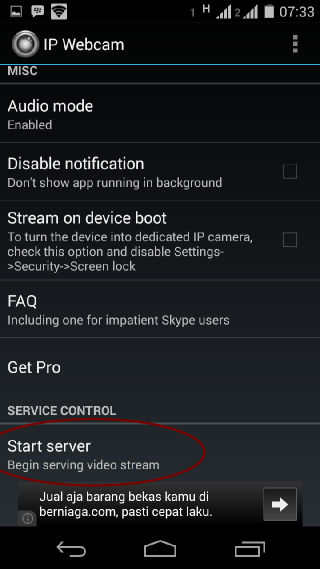
- Dari situ,kita akan mendapatkan IP dari webcam ponsel android kita.

- Lalu kita buka software VLC player kita,masuk ke media > open network stream > network. Lalu pada kolom please enter a network URL,kita masukan IP webcam dari ponsel kita tadi.
Contoh : http: //192.168.43.1:8080/videofeed, lalu kita tekan play.

- Dan hasilnya bisa dilihat seperti gambar,tampak penulis sedang menggunakan CCTV sederhana ini untuk memantau motor penulis yang terparkir diluar.


Ingat,gunakan aplikasi ini untuk hal-hal yang positif saja ya,jangan gunakan untuk hal-hal yang negatif.
semoga ilmu ini bermanfaat.